Prosta gra z wykorzystaniem G-sensor
szymcioh
Ostatnio dla zabicia czasu stworzyłem prostą grę w XE7. Nie jestem profesjonalistą toteż ten artykuł nie będzie idealny, chce w nim pokazać że się da. Może zainspiruje kogoś tym do jakiegoś większego projektu ;).
No więc zaczynamy.
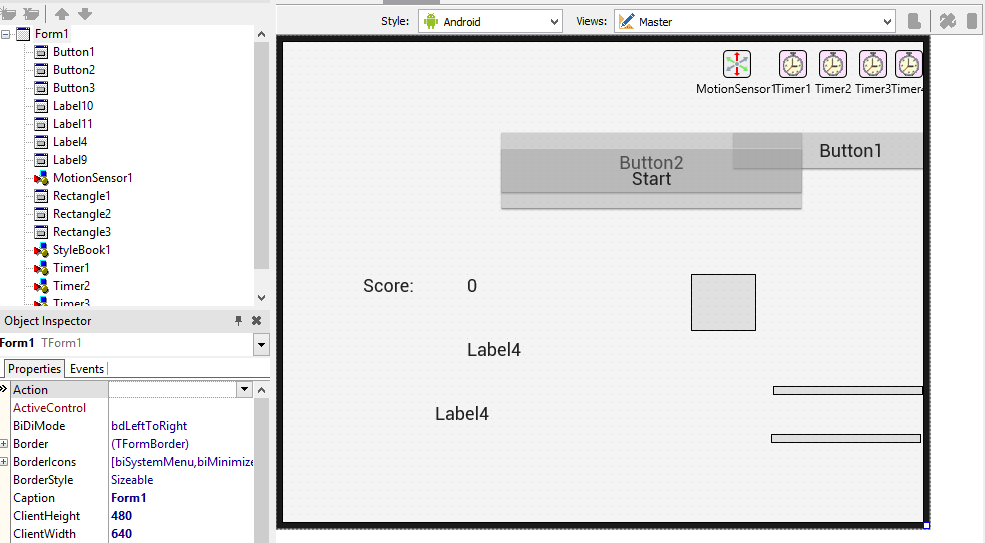
Tworzymy "Multi-Device Application" i zakładamy na forme:
-3x Button
-4x Label
-1x MotionSensor
-3x Rectangle
-4x Timer
-1x StyleBook (opcjonalnie, do poprawy wyglądu)
Powinno to wyglądać o tak:

Do globalnych zmiennych dodajemy:
var
  Form1: TForm1;
  p1x,
  p1y,
  p2x,
  p2y,
  p3x,
  p3y: real;
  b: byte;
Klikamy dwukrotnie na Timer1 i wpisujemy:
  rectangle1.Position.X := p1x;
  rectangle1.Position.Y := p1Y;

  rectangle2.Position.X := p2X;
  rectangle2.Position.Y := P2Y;

  rectangle3.Position.X := p3X;
  rectangle3.Position.Y := P3Y;

  Application.ProcessMessages;
Klikamy dwukrotnie na Timer2 i wpisujemy:
var
a: integer;
begin
  if p1y < 0 then
  begin
    b := 0;
    p1y := p1y + 15;
  end;
  if ((trunc(p1y) < trunc(p3y) - rectangle1.Height)) and ((trunc(p1y) > trunc(p3y) - rectangle1.Height - 5))and (p1x > p3x - rectangle1.Width / 1.3) and (p1x < p3x + (rectangle3.Width - rectangle1.Width) + rectangle1.Width / 1.3) then
  begin
    if b = 0 then
    begin
    label4.Text := inttostr(strtoint(label4.text) + 1);
    end;
    b := 1;
  end;

  if ((trunc(p1y) < trunc(p2y) - rectangle1.Height)) and ((trunc(p1y) > trunc(p2y) - rectangle1.Height - 5))and (p1x > p2x - rectangle1.Width / 1.3) and (p1x < p2x + (rectangle2.Width - rectangle1.Width) + rectangle1.Width / 1.3) then
  begin
    if b = 0 then
    begin
    label4.Text := inttostr(strtoint(label4.text) + 1);
    end;
    b := 1;
  end;

  if p1y > form1.Height + 250  then
  begin
    b := 1;
    p1y := form1.Height - 63;
    p1x := form1.Width / 2;
    if strtoint(label4.Text) > strtoint(label2.Text) then
      label2.Text := label4.Text;
    label4.Text := '0';
  end;

  if b = 1 then
  begin
    p1y := p1y - 5;
    if (rectangle1.Position.X + 20 * motionsensor1.Sensor.AccelerationY < form1.Width) and (rectangle1.Position.X + 20 * motionsensor1.Sensor.AccelerationY > 0) then
    p1x := rectangle1.Position.X + 20 * motionsensor1.Sensor.AccelerationY;
  end;


  if b = 0 then
  begin
    p1y := p1y + 5;
    if (rectangle1.Position.X + 20 * motionsensor1.Sensor.AccelerationY < form1.Width) and (rectangle1.Position.X + 20 * motionsensor1.Sensor.AccelerationY > 0) then
    p1x := rectangle1.Position.X + 20 * motionsensor1.Sensor.AccelerationY;
  end;
end;
Klikamy dwukrotnie na Timer3 i wpisujemy:
  p2y := form1.Height / 1.3;
  p2x := rectangle2.Position.X - 10;
  if rectangle2.Position.X < -150 then
  begin
    p2x := form1.Width;
    timer3.Interval := Random(150)+10;
  end;
Klikamy dwukrotnie na Timer4 i wpisujemy:
  p3y := form1.Height / 1.3;
  p3x := rectangle3.Position.X + 10;
  if rectangle3.Position.X > form1.Width + 150 then
  begin
    p3x := - 150;
    timer4.Interval := Random(150) + 10;
  end;
W Form1 we zakładce events wybieramy "OnCreate" i piszemy:
  Timer1.Enabled:=False;
  Timer2.Enabled:=False;
  Timer3.Enabled:=False;
  Timer4.Enabled:=False;
  p1x := form1.Width / 2;
  p1y := form1.Height;
Teraz zostały nam tylko buttony do wpisania kodu, kolejno dwukrotnie klikamy na:
-Button1
  Timer1.Enabled:=False;
  Timer2.Enabled:=False;
  Timer3.Enabled:=False;
  Timer4.Enabled:=False;
  button2.Visible:=True;
  button3.Visible:=True;
-Button2
  Timer1.Enabled:=True;
  Timer2.Enabled:=True;
  Timer3.Enabled:=True;
  Timer4.Enabled:=True;
  button2.Visible:=False;
  button3.Visible:=False;
-Button3
close;
To tyle jeśli chodzi o przepisywanie "surowego kodu".
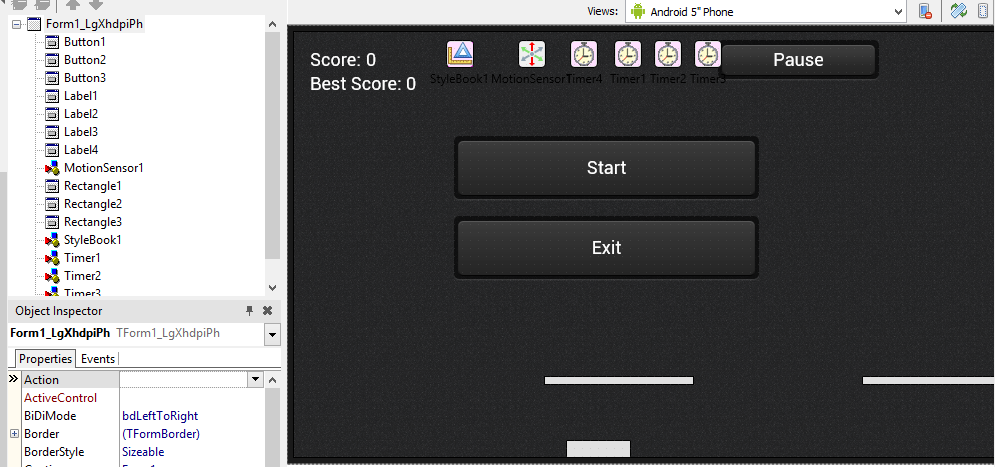
Teraz zmieniamy nazwe:
-Button1 na "Pause"
-Button2 na "Start"
-Button3 na "Exit"
-Label1 na "Best Score"
-Label2 na "0"
-Label3 na "Score"
-Label4 na "0"
U mnie wygłąda to o tak:

W ostatnim etapie Interval Timer1 ustawiamy na "1" a pozostałych timerów na "30".
MotionSensor1 ustawiamy Active na "True"
Teraz z górnego paska wybieramy kolejno Project --> Options --> Application i zaznaczamy "Enables custon orientation" i "Landscape home right".
I nasz projekt jest gotowy do działania (hura :))
Opcjonalnie możemy pobrać "Premium Styles" do naszego XE7 wybrać je w StyleBook1 i w Properties Form1 wybrać StyleBook: StyleBook1. "Uładni" nam to grafikę lecz nie jest niezbędne. Link do "Premium Styles" http://www.4shared.com/zip/CoQ[...]8_firemonkey_premium_style.htm
Tym samym doszliśmy na koniec mojego artykułu, mam nadzieje że pomoże on chociaż jednej osobie :).
Jest to mój pierwszy raz więc proszę o wyrozumiałość.
Na koniec jeszcze amatorski filmik z końcowym efektem: